Selasa, 15 September 2009
Crooked Knife Project - Part 1: Salvaging Blades
Even though my bark canoe is pretty much finished and I sort of "cheated" by using a block plane for most of the shaving, I've been intrigued with the design and functionality of the crooked knife and have been thinking about making one for "bushcraft style" paddlemaking for some time. Graham Warren's paddlemaking book has a chapter (written by David Gidmark) that shows the steps in making a crooked knife from an old file but discusses using propane torches and bench grinders for the bulk of the work - a little intimidating for me.
I had already obtained a manufactured crooked knife from John Lindman's model canoe kit, but the blade was horribly dull, the metal was wouldn't sharpen properly, and the rivetted handle was uncomfortable in my hands. The instructions that came in the kit mentioned that the blade was still soft and not really hardened enough to sharpen with a stone. It had to be superheated (to cherry red) and plunged into oil in order to harden it all the while not damaging the wooden handle. I figured since I disliked the handle, I would drill out the rivets, salvage the blade, rework the metal to a sharper edge and make my own customed knife.
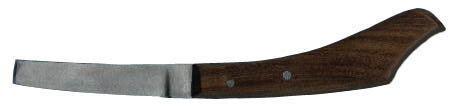
Manufactured Crooked Knife
Then, as if it was waiting to be reincarnated, I stumbled upon a 6" rusted Mill Bastard file in my father's old toolbox. I vaguely remember him using such a file to sharpen old garden shears and the lawn mower blade back in 70's. Inspired by some illustrations in old texts as well as this posting of making a crooked knife without a forge or powertools, I set out to make a crooked knife from scratch. If my efforts failed, then at least I'd have the manufactured blade to rely on.

The file destined to become the blade

Illustration of making a crooked knife
First of course, the metal file needed to be needed to be softened by heating up to a bright orange colour and cooling softely. This was achieved lighting up the fireplace with hot burning hardwood on a rainy evening and heating the file on the coals. An empty juice can stuffed with cold ashes (obtained from a campfire pit that morning) would serve as the cooling medium, although I read that one could also use sand and vermiculite from gardening stores.

Heated file cooling overnight in ashes
The next day the file was removed and the tip tested for softness by cutting into it with a hacksaw. If the blade had not annealed properly, the sawteeth wouldn't have been able to bite and make a cut. Heating in the fireplace seemed sufficient as photo below shows.

Test cut with a hacksaw...metal now softened
Then the labour truly began. Using another identical file on hand, the metal teeth and ridges were filed off with hand grinding. This messy, tiring and boring job took a whole lot of time over the course of a week, but it did work. When both sides and the edges had been ground relatively smooth, an angled edge was begun. I marked up 1/4" line from the edge with permanent marker and ground the side down to a chisel edge with an angled motion of the file. This left some scratched tool marks on the metal which I tried to clean up with 400grit automotive sandpaper. By this point (with very sore wrists and forearm muscles), I gave up on trying to polish the thing to a mirror image. Here is the result after many (non consecutive days) of working the file.


Filing off the teeth; Blade shaped and polished
In another post, I'll be documenting the next steps, including tempering the blade and making a customized handle.
Sept 25 UPDATE - Part 2 has been posted
Langgan:
Catat Ulasan (Atom)
Tiada ulasan:
Catat Ulasan