Memaparkan catatan dengan label Canoe Gear. Papar semua catatan
Memaparkan catatan dengan label Canoe Gear. Papar semua catatan
Isnin, 22 Jun 2015
Leather Paddle Hanger
A while back, I wrote a post about Norquay Company, a Canadian startup which is trying to put an artistic touch to utilitarian paddles. Their ever-growing series of artisan canoe paddles are manufactured by Teal Canoe in New Liskeard, Ontario with bold patterns painted on the blade.
Also featured on the site is their Leather Paddle Harness, a simple and rustic looking way of suspending a paddle.

With the recent completion of my 2nd son's heirloom paddle, I wanted to hang it and his brother's paddle in the basement man cave. However, I've found that most paddle hangers only function properly with a standard shaped pear grip and not with the elongated style grips featured on my own paddles. With a batch of leather scraps waiting to be used, I set out to make two of these styles of hangers.

I ended up using pieces roughly 4" long by 1.5" wide but this can be enlarged or reduced depending on what you want. Holes were punched in the corners.

An edging tool used to give some borders.

In my case, a piece of scrap lace was used that would not match the final color, but it didn't matter since it would not be visible in the final hanging. The pic below shows the partial lacing pattern (the final knot has not been tied yet)

After stamping my son's name and staining in a mahogany color, the leather harness was placed on the grip loosely. The tension created by pulling on the loop (right side) created an effective friction fit on the northwoods style grip. This would then been hung on a standard picture frame hook.

Here's a pic of it suspended in place...

And a final pic of my boys' heirloom paddles on the basement wall next to my bourbon shelf...

Read More..
Also featured on the site is their Leather Paddle Harness, a simple and rustic looking way of suspending a paddle.

Norquay Leather Paddle Harness
With the recent completion of my 2nd son's heirloom paddle, I wanted to hang it and his brother's paddle in the basement man cave. However, I've found that most paddle hangers only function properly with a standard shaped pear grip and not with the elongated style grips featured on my own paddles. With a batch of leather scraps waiting to be used, I set out to make two of these styles of hangers.
Leather Scraps
I ended up using pieces roughly 4" long by 1.5" wide but this can be enlarged or reduced depending on what you want. Holes were punched in the corners.
In my case, a piece of scrap lace was used that would not match the final color, but it didn't matter since it would not be visible in the final hanging. The pic below shows the partial lacing pattern (the final knot has not been tied yet)
After stamping my son's name and staining in a mahogany color, the leather harness was placed on the grip loosely. The tension created by pulling on the loop (right side) created an effective friction fit on the northwoods style grip. This would then been hung on a standard picture frame hook.
Here's a pic of it suspended in place...
And a final pic of my boys' heirloom paddles on the basement wall next to my bourbon shelf...

Jumaat, 6 Mac 2015
Paddle tarp cups
Always like to repurpose gear when in camp. Why should paddles only be functional in the water? Setting up tarps with canoe paddles isn't a new idea, but often the paddle shaft or grip isn't conducive to tying support lines. After doing an image search for tarp and paddles, I stumbled upon Poster Chainsaw's 2009 review of the True North tarp over on the Song of the Paddle Forums. His thread "True North Big Tarp Review" features a tarp setup with an additional accessory.
True North Outdoor Company in the UK apparently includes 2 little mesh bags with sewn webbing meant to be slipped over the grips of the paddles and provide and anchor point for the lines...


It's a pretty simple design and concept. I've always gotten away with just tying a clove hitch around the paddle, but with the elongated guide style grips I prefer, the guy-lines would often slip down. Sometimes a paddle can simply be jammed under the tarp with just plain old tension serving as a support. This little contraption looks to allow the paddles to be setup slightly ahead of the tarp which is needed in certain configurations.
Poster Neiltoo on Ni-Wild - Northern Ireland Outdoors Community - made up a similar strap device to assist setting up his hammock tarp. Here are some pics of his creation on the thread "Using Paddles with a Tarp"


Read More..
True North Outdoor Company in the UK apparently includes 2 little mesh bags with sewn webbing meant to be slipped over the grips of the paddles and provide and anchor point for the lines...
It's a pretty simple design and concept. I've always gotten away with just tying a clove hitch around the paddle, but with the elongated guide style grips I prefer, the guy-lines would often slip down. Sometimes a paddle can simply be jammed under the tarp with just plain old tension serving as a support. This little contraption looks to allow the paddles to be setup slightly ahead of the tarp which is needed in certain configurations.
Poster Neiltoo on Ni-Wild - Northern Ireland Outdoors Community - made up a similar strap device to assist setting up his hammock tarp. Here are some pics of his creation on the thread "Using Paddles with a Tarp"
Photo Credit Neiltoo on Ni-Wild Forums
Lastly, ulltralight gear site, Zpacks.com, is selling a product called "Trekking Pole Cups". These triangular Cuben fabric cups go over the handles of trekking poles but could easily be used for canoe paddles as well. Here's a closeup from their site.
Zpacks Trekking Pole Cups
Might be tinkering with something along these lines for another another winter project to work on using some scraps.
Selasa, 3 Februari 2015
Rod & Gun - Paddle Clothsline Camp
The July 1910 edition of Rod and Gun in Canada (Vol. 12 No. 2) features a descriptive article entitled "Canoeing on Lake Superior" by Frederic Goodson Higbee. Along with lovely images of the landscape, page 167 features a panoramic photo of the author's camp. It features a comfortable looking Baker / Campfire tent rigged up by the shore.

What caught my attention was the lengthy clothesline stretched out in the background set up so that it would catch the breezes by the shore. Though the image is grainy, you can see one end of the line anchored to the canoe with a paddle used as an additional height support. Looks like another creative way to use a paddle while in camp.

Read More..
What caught my attention was the lengthy clothesline stretched out in the background set up so that it would catch the breezes by the shore. Though the image is grainy, you can see one end of the line anchored to the canoe with a paddle used as an additional height support. Looks like another creative way to use a paddle while in camp.
Paddle Clothesline support - closeup
Rabu, 28 Januari 2015
DIY Bucksaw Camping Chair
One of the winter projects I've been working on is a collapsible camp chair for canoe tripping. I used my homemade stool / convertible camera tripod last season, but it would be nice to have something with a backrest. A lot of folks in the paddling community have been raving about the Helinox Chair One, but spending over $100 for camp chair felt excessive given our current needs for a seemingly endless diaper supply.
After stumbling on Tony Miller's Pinterest page "Canoe Projects", I came across the source of inspiration...the Knudsen Bucksaw Chair!

Designed by Dutch engineer Ole Gierl�v Knudsen in 1962, it and an accompanying cot were created for a camping trip with his son. The original chairs from the 60s are apparently expensive collector's items today and are being re-made for the modern market, though mostly as indoor furniture for the urban chic crowd.
The chair is held together by the tension of the windlass cord and fabric. The wood components are custom carved and the whole thing collapses into a stuff sac.

For a while I toyed with the idea of recreating the exact chair, using scrap canvas to sew the fabric and some Sassafras for the wood components. But with less free time available lately, I simplified the idea with prefabricated scraps at home. All of the wood components were leftovers originally purchased at Home Depot, so they are pretty accessible. Here is what I came up with. Unofficially, it's called the Basmati Rice Burlap Bucksaw Chair.

Little different that the original inspiration in that there are two windlass cords for the front and rear legs with a fabric back and wooden slats for a seat. But the concept of using tension similar to a bucksaw is the same.
Here are the components laid out from top to bottom:

Unlike the original Knudsen Bucksaw chair which has the seat legs nestled into a carved space on the exterior of the backrest frame, I ended simply attaching 2 cut block of maple onto each long using some glue and screws. Took some trial and error, but eventually settled on on placing these blocks so that the space created between would be 7" from the leg bottom.
Also, I ended deviating from the Knudsen design by purposely flipping the legs so that these notches facing inward rather than outward. The following sequence of pics might explain this better.
Here is the 1st step. Stick the long legs into the burlap sack with the "blocks" facing inward and tension with the cross piece and cord.

Then I place the other short legs into the support blocks and tension with the second dowel and cord. The tension created by the inner structure has a sort of friction lock at this stage. This is the view of the back of the chair...

Flip up and adjust how far back you want the chair to lean. This is accomplished by slightly squeezing the shorter seat legs towards each other near the block supports. The legs can then slide through the blocks and when you let go, they snap outwards again for an instant friction lock.
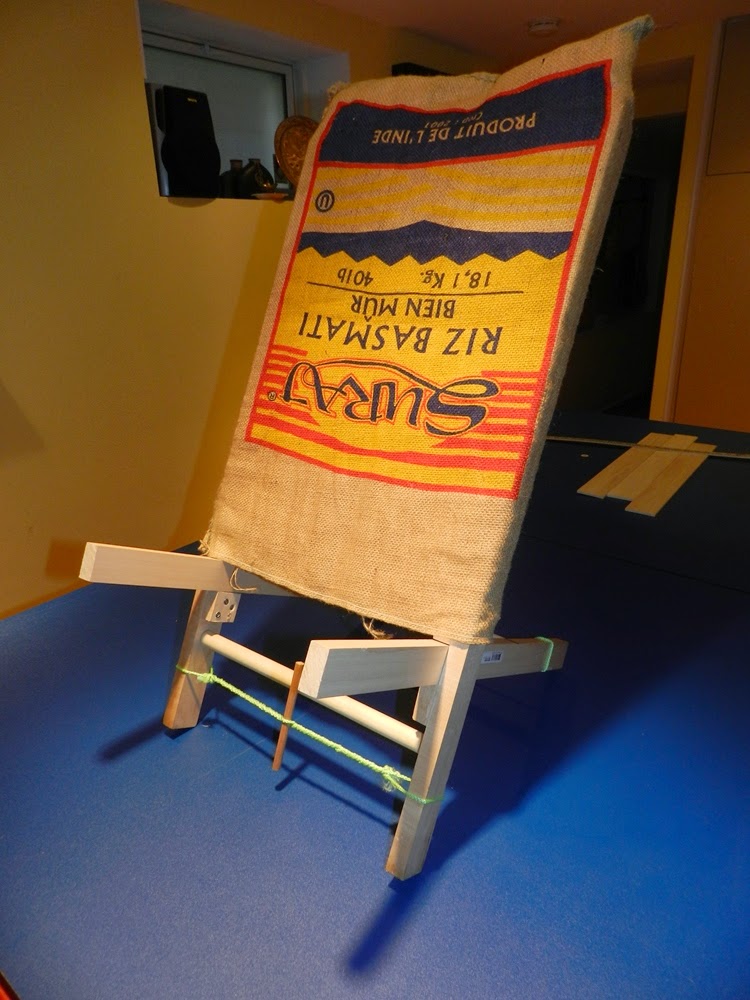
I had originally thought of using fabric for the seat again, but found that because of the width of the burlap back rest, something would need to be customized. I later got the inspiration from my 6 year old son who was playing with the 1/4" poplar boards building a sort of racetrack. I snagged 3 of his boards and found that they could easily rest, edge on edge on the projecting maple seat legs and sure enough work as a comfortable enough seat.

The take down process is quite fast and with the components stacked neatly and secured with the cordage it forms a nice bundle.
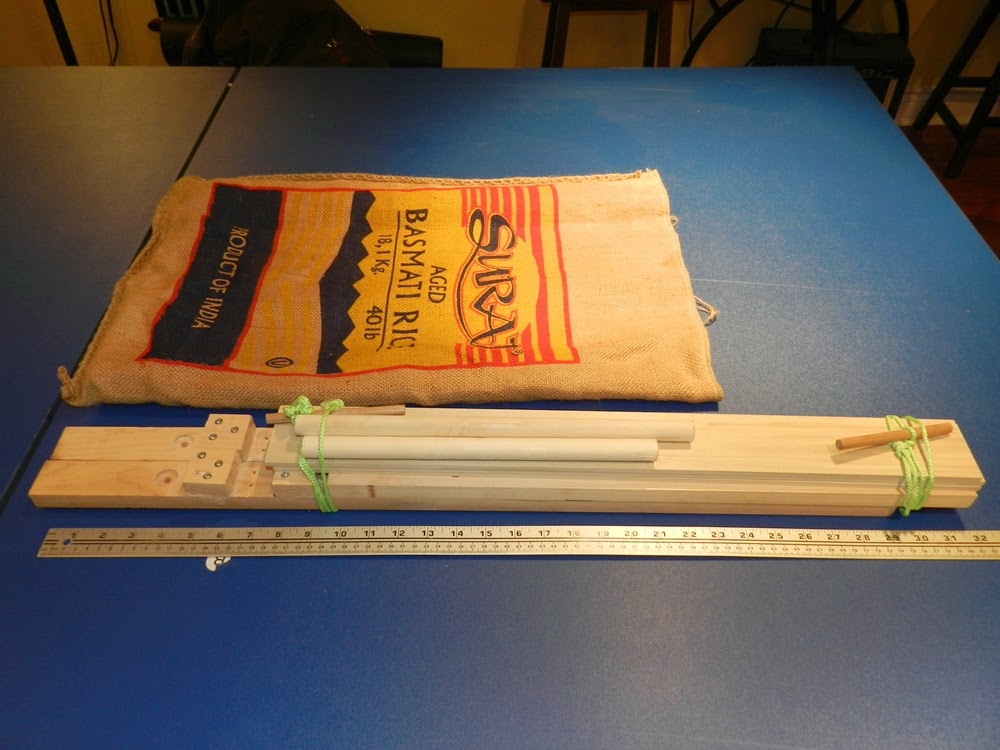
Here it is wrapped in the burlap sack. At 32" long, it just makes the cut for fitting in my Woods canvas pack. I also have an unused, narrow tent stuff sack that would be big enough to carry the whole thing and protect it from the elements if it needed to be lashed to the exterior. Or it could be lashed under the tumpline on the wanigan. Final weight is 4.8lbs. Like I mentioned before, it'll never be as compact and lightweight as the 2 lb Helinox chair, but I can live with weight difference.

Of course this is still in the raw stage. The wood hasn't been treated and I could tweak it a bit more but for now it is a functional chair. During one of our more balmy (-1C), depressingly snowless January days here in Toronto, I took it out to the backyard for a little test. Here is the backyard campsite complete with firebowl, kerosene lamp and a still uncompleted paddle thrown in for good measure.
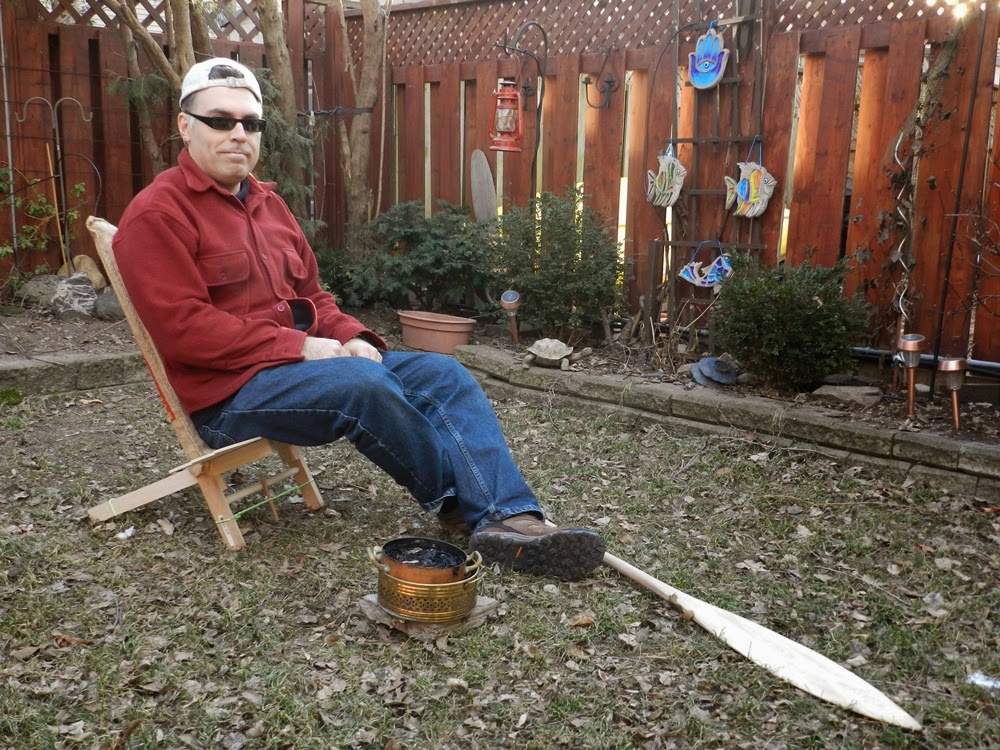
Since I also tend to carry my Stewart River waxed canvas kneeling pads while paddling, I could theoretically use on of them as extra padding for ultimate camp cushioning.
Read More..
After stumbling on Tony Miller's Pinterest page "Canoe Projects", I came across the source of inspiration...the Knudsen Bucksaw Chair!
Designed by Dutch engineer Ole Gierl�v Knudsen in 1962, it and an accompanying cot were created for a camping trip with his son. The original chairs from the 60s are apparently expensive collector's items today and are being re-made for the modern market, though mostly as indoor furniture for the urban chic crowd.
The chair is held together by the tension of the windlass cord and fabric. The wood components are custom carved and the whole thing collapses into a stuff sac.
For a while I toyed with the idea of recreating the exact chair, using scrap canvas to sew the fabric and some Sassafras for the wood components. But with less free time available lately, I simplified the idea with prefabricated scraps at home. All of the wood components were leftovers originally purchased at Home Depot, so they are pretty accessible. Here is what I came up with. Unofficially, it's called the Basmati Rice Burlap Bucksaw Chair.
Little different that the original inspiration in that there are two windlass cords for the front and rear legs with a fabric back and wooden slats for a seat. But the concept of using tension similar to a bucksaw is the same.
Here are the components laid out from top to bottom:
- Backrest fabric is a 17" w x 26" l burlap bag of rice - an old pillow case could work too.
- seat slats are 3 loose pieces of 1/4" x 2.5" w x 24" l poplar panels
- 2 seat legs made from a remnant of 1x2x8 of maple (actual dimensions are 3/4" x 1.5"w x 22" l)
- 2 backrest legs made from the same maple stock ( 3/4" x 1.5"w x 30" l)
- 2, 3/4" poplar dowels for the cross braces (long one = 13.5"; short one is 11-7/8ths")
- some cordage and 1/4 dowel sticks
Unlike the original Knudsen Bucksaw chair which has the seat legs nestled into a carved space on the exterior of the backrest frame, I ended simply attaching 2 cut block of maple onto each long using some glue and screws. Took some trial and error, but eventually settled on on placing these blocks so that the space created between would be 7" from the leg bottom.
Also, I ended deviating from the Knudsen design by purposely flipping the legs so that these notches facing inward rather than outward. The following sequence of pics might explain this better.
Here is the 1st step. Stick the long legs into the burlap sack with the "blocks" facing inward and tension with the cross piece and cord.
Then I place the other short legs into the support blocks and tension with the second dowel and cord. The tension created by the inner structure has a sort of friction lock at this stage. This is the view of the back of the chair...
Flip up and adjust how far back you want the chair to lean. This is accomplished by slightly squeezing the shorter seat legs towards each other near the block supports. The legs can then slide through the blocks and when you let go, they snap outwards again for an instant friction lock.
I had originally thought of using fabric for the seat again, but found that because of the width of the burlap back rest, something would need to be customized. I later got the inspiration from my 6 year old son who was playing with the 1/4" poplar boards building a sort of racetrack. I snagged 3 of his boards and found that they could easily rest, edge on edge on the projecting maple seat legs and sure enough work as a comfortable enough seat.
The take down process is quite fast and with the components stacked neatly and secured with the cordage it forms a nice bundle.
Here it is wrapped in the burlap sack. At 32" long, it just makes the cut for fitting in my Woods canvas pack. I also have an unused, narrow tent stuff sack that would be big enough to carry the whole thing and protect it from the elements if it needed to be lashed to the exterior. Or it could be lashed under the tumpline on the wanigan. Final weight is 4.8lbs. Like I mentioned before, it'll never be as compact and lightweight as the 2 lb Helinox chair, but I can live with weight difference.
Jumaat, 19 Disember 2014
Alternate Canoe Tump Tying Method
Calvin Rutstrum's outdoor classic, Way of the Wilderness, is often cited as an important book showcasing outdoor and canoeing skills. Published in 1946, it features some of his practical ideas for canoe camping at the time. Pages 25-26 have a brief blurb on portaging a canoe with a tumpline rigged up in a different manner than other sources.
After setting up the headband between two paddle blades, the tump straps are lashed around the blades and extended to the thwart where the remaining ends are used to lash the handles.

Never used this method before, since I find the paddle blades a bit claustrophobic around the head. Plus I tend to bring two paddles with different blade shapes when paddling and so end up with an uneven load on the shoulders. Still, this method means no need to use any other cordage or lashings for the paddles.
This method is apparently not Rutstrum's creation. A descriptive article simply entitled "Carrying a Canoe" by Richard Garwood Lewis appeared in the April 1930 edition of Field and Stream (Vol. 34 No. 12). In one of his photos, you can see the paddles rigged out in a flared manner (providing more headroom than Rutstrum's illustration) with the tumpline straps extending along the shafts to the lashed grips


Read More..
After setting up the headband between two paddle blades, the tump straps are lashed around the blades and extended to the thwart where the remaining ends are used to lash the handles.
Way of the Wilderness, p. 25
Never used this method before, since I find the paddle blades a bit claustrophobic around the head. Plus I tend to bring two paddles with different blade shapes when paddling and so end up with an uneven load on the shoulders. Still, this method means no need to use any other cordage or lashings for the paddles.
This method is apparently not Rutstrum's creation. A descriptive article simply entitled "Carrying a Canoe" by Richard Garwood Lewis appeared in the April 1930 edition of Field and Stream (Vol. 34 No. 12). In one of his photos, you can see the paddles rigged out in a flared manner (providing more headroom than Rutstrum's illustration) with the tumpline straps extending along the shafts to the lashed grips
Tumpline Lashing Method Closeup
Isnin, 1 Disember 2014
Canoe Paddle Bridle - Lining Method Pic
One of the methods of lining and tracking a canoe in rapids involves tying a rope in a sort of bridle so that the main pulling force is below the waterline. A good illustration of this canoe can be found in Pierre Pulling's Principles of Canoeing available online on Hathitrust.org (Fig. 14, Page 109).


Read More..
Page 109 - Principles of Canoeing
Ray Goodwin's 2011 publication, Canoeing, has an step by step photo sequence of the tying method on pages 170-171. These pages are available for preview here (*pdf format). I've used this method before (see poling daytrip post here) but find tying and untying a little cumbersome so often leave the towing bridle attached with the rope in the canoe until the next opportunity for lining / tracking arises.
Recently, I stumbled across a scanned digital edition of Field and Stream (April 1933 Vol. 37 No. 12 ). Page 70 had a tiny article with an illustration with a different method. This one involves a simple slip-knot and a paddle for tension to form an alternate bridle method. Here's the brief clipping...

Since I've never seen this method before, I posted a thread about it over on the CanoeTripping.net forums to get some feedback from more experienced trippers. There are a few responses from folks who give it a thumbs up. Hoping to try this out for myself next season and will report back.
Khamis, 27 November 2014
Early Chestnut Bobs Special with Tumpline
An Ebay seller has posted what looks to be an early (1920s-30s) Chestnut Bobs Special wood canvas canoe.
These wide beam canoes were first marketed as "50-Pound Specials" since they weighed roughly 50 pounds and were nearly 10 pounds lighter than any other canoe of comparable size using novel construction methods of the time. Their relatively flat bottoms allowed for more stability when standing in flat water so were preferred by fisherman and other sportsmen. A more detailed history of the Bobs Special (including the curious originating source of the name) can be read in this article by Kaydi Pyette of Canoe Roots magazine.
One of the more "famous" users of this canoe was Grey Owl (Archie Belaney). Here is a photo of him standing in an early model 50 Pound Special. The photo was taken during his stay in Prince Albert Nation Park sometime after 1931.

Grey Owl in Chestnut 50-Pound (Bobs) Special
Back in 2010, I wrote a post researching Grey Owl's paddles and discovered that one of the paddles he used is kept in his cabin on Lake Ajawaan, SK. That post also has 2 silent films from the National Film Board of Canada showcasing his skills in a canoe.
Anyway, the Ebay canoe up for sale needs new canvas along with some minor planking and seat repairs. But overall, it looks to be in great condition for the age. What caught my attention however, is the original home-made tumpline (all stitched - no rivets) along with a custom carved notched carrying bar.


A closeup shows a carved indent in the middle of the carrying bar where it was lashed with a separate piece of cordage to the centre thwart. Additional cordage is wrapped with hitches to slide the paddle blades through.

Apparently this canoe has its original canvas and has sat unused under a cabin for quite a while. Either way, the original paddler knew about this method of rigging. Hopefully, this interesting canoe will be purchased by someone who will restore it and bring it back to its full tripping glory.
Selasa, 29 Julai 2014
Wanigan Lid Tree Shelf
While dabbling around on the net, I stumbled on this thread regarding Lightweight Camping Tables on the BWCA forums. Seems like some folks have come up with neat plywood tables that setup on trees to get some basic gear off the ground...

deancamp's camping table

okinaw55's suspended camping table
Turns out that there are some commercial versions out there including the Coleman Gear Station complete with lantern hooks...

I'm also familiar with the much more elaborate Mason Kitchen designed by Paul Mason. It's described on his site here. Kevin Callan & crew often feature them in their many canoeing adventure videos. Here's a youtube video link of the gang using it in Woodland Caribou Provincial Park.


Mason Kitchen
Anyway, while dreaming about future backcountry trip I thought about the idea multi-purposing the leather tumpline on the wanigan to suspend the lid as a sort of tree shelf. I'm sure seasoned trippers have done something like this before, but I haven't found any pics online showcasing this concept.
There's a spot on the cottage property that has some nice trees and I often set up my Hennessy Hammock to get a bug free afternoon snooze. This time I brought along the wanigan for the experiment. The leather tumpline was slipped off without untying all the knots. The headband was placed over the hammock's suspension straps around the tree. A low hanging branch could've also worked. The remaining leather loops which normally go under the base of the wanigan were used to support the wanigan lid and I ended up with a functional & sturdy elevated table.
Here's a view from the side...

Wanigan lid "shelf" suspended from Tump
Loaded up the shelf with some of the typical gear I might carry. On the left is a Trangia Mini cookset with an extra stainless steel bowl found at a thrift store. On the right is a separate SS kettle I like to use for the constant boiling of water for hot beverages. Can't tell, but there is a homemade alcohol stove underneath it along with the SS plate. My trusty flask of bourbon rounds out the shelf.

Loaded up in the practice camp
Anyway, seems like a feasible way to temporarily rig up some usable work space in camp. Of course, the lid would have to go back on at night to prevent the critters from getting into the food supply. The lid can be easily removed to snap back on at night and the tied tumpline simply slipped back around the wanigan when it's time to break camp. One of the benefits of lugging a cumbersome wooden box on a trip is the flat surface in camp. Put it on the ground and you have an instant bench for food prep & entertainment. Now that there's this hanging shelf option, I'm looking forward to getting some backcountry time with it.
Rabu, 7 Mei 2014
Wanigan Build
For quite a while now, I've wanted to build a wanigan box to add to my homemade collection traditional canoe gear. The intention was not to build a heavy duty wanigan for rough use, but instead make something functional for light duty tripping and some of my upriver poling trips. Plus, there was a a growing pile of wood scraps and leather components accumulating in the house so thought this would be great winter project to use up some stuff.
Wanigan construction is pretty straight forward and there are some online tutorials on various construction methods on the web.
� Wanigan article from (Boys Life, 1953) posted on this site
� this online tutorial by the Northwest Woodsman
� Connor Mihell's Canoe & Kayak magazine article, "Winter project: the DIY wannigan"
� Mike McIntosh's wanigan build on this myccr thread
� Art Mulder's greatly illustrated tutorial on familywoodworking.org
Years ago, I had cut a sheet of 4'x4' - 1/4" birch plywood into panels to do some pyrography artwork. Some of the left-over pieces included 12" x 20" boards that seemed perfect to use in this wanigan project. So ultimately, these pieces determined the overall dimensions of the build. Overall this means it is smaller than the typical tripping size wanigans out there, but I'll be using it solo anyway so it won't be too overloaded with stuff.
The bottom piece and two short sides are from 1 x 12 pine left over from building some crude shelves for a storage room.

With some waterproof glue and brass screws, the basic box was pretty straight forward to put together.


The tumpline headstrap was made using a 3" wide by 15" long piece of veg tan leather. After roughly measuring the wanigan box, it was determined that roughly 9 feet tails were needed to tie up the rig. My local leather shop had a great sale on and I was able to pick up three, 3/4" by 6' straps at a great price (basically like a 3 for 1 deal) since they had some minor surface damage. One of these straps was cut in half and the resulting 3 foot pieces were stitched and riveted onto the end of the other 6' straps to complete the required length. The whole thing took a while to oil but it was a pretty relaxing process while the weather outside was so crappy.

Many wanigans also have an inner rail to support a tray for loose kitchen items. Wasn't sure I was going to do this until I remember an unused 11"x14" birch gallery art panel. Once inverted this art panel (built with a 2" frame) could be a light duty tray. Turns out it fit nicely. The rails were made from 3/4" square poplar dowels
The Keewaydin method of constructing a wanigan has notched handles to prevent the lid from sliding forward and back, but I ended up using brass box latches that were originally intended for a humidor project that never materialized.
In addition I wanted to emulate Rob's beautifully decorated camping boxes (see post here) with some tripping appropriate pyrography art. Pine doesn't shade well with pyrography equipment given the grain and resin content, so ended up using a single burn temperature for a basic scroll pattern for the sides. The poplar plywood lid is a bit of a better medium for burning and ended up decorating with a monochromatic camp scene. Wanted to emulate the style of wonderful illustrator Les Kouba and the image is a modified scence from Rutstrum's North American Canoe Country
Here is the final result...

In the end, I decided against adding more artwork on the birch side panels and just varnished the exterior of the whole thing for some basic weather protection. Almost all of my gear is up north with the canoe at the moment, so the wanigan is empty for now. But it is strapped up and ready to go...

Hoping to get some fun usage out of this wanigan along with the homemade camp stool made the previous winter.
Read More..
Wanigan construction is pretty straight forward and there are some online tutorials on various construction methods on the web.
� Wanigan article from (Boys Life, 1953) posted on this site
� this online tutorial by the Northwest Woodsman
� Connor Mihell's Canoe & Kayak magazine article, "Winter project: the DIY wannigan"
� Mike McIntosh's wanigan build on this myccr thread
� Art Mulder's greatly illustrated tutorial on familywoodworking.org
Years ago, I had cut a sheet of 4'x4' - 1/4" birch plywood into panels to do some pyrography artwork. Some of the left-over pieces included 12" x 20" boards that seemed perfect to use in this wanigan project. So ultimately, these pieces determined the overall dimensions of the build. Overall this means it is smaller than the typical tripping size wanigans out there, but I'll be using it solo anyway so it won't be too overloaded with stuff.
The bottom piece and two short sides are from 1 x 12 pine left over from building some crude shelves for a storage room.
Basic pieces - birch plywood and pine
With some waterproof glue and brass screws, the basic box was pretty straight forward to put together.
Assembly
The lid was cut from scrap piece of 1/2" poplar plywood with the handles and wanigan feet made from 1x2x6 pine. Before attaching the handles with glue and wood screws, I used a spokeshave to angle the bottom edge. This small modification makes the wanigan easier to pick up with pudgy fingers like mine.
Angling bottom edge of handles before mounting to sides
The basic box with lid
The tumpline headstrap was made using a 3" wide by 15" long piece of veg tan leather. After roughly measuring the wanigan box, it was determined that roughly 9 feet tails were needed to tie up the rig. My local leather shop had a great sale on and I was able to pick up three, 3/4" by 6' straps at a great price (basically like a 3 for 1 deal) since they had some minor surface damage. One of these straps was cut in half and the resulting 3 foot pieces were stitched and riveted onto the end of the other 6' straps to complete the required length. The whole thing took a while to oil but it was a pretty relaxing process while the weather outside was so crappy.
Putting together a tumpline
Many wanigans also have an inner rail to support a tray for loose kitchen items. Wasn't sure I was going to do this until I remember an unused 11"x14" birch gallery art panel. Once inverted this art panel (built with a 2" frame) could be a light duty tray. Turns out it fit nicely. The rails were made from 3/4" square poplar dowels
The Keewaydin method of constructing a wanigan has notched handles to prevent the lid from sliding forward and back, but I ended up using brass box latches that were originally intended for a humidor project that never materialized.
In addition I wanted to emulate Rob's beautifully decorated camping boxes (see post here) with some tripping appropriate pyrography art. Pine doesn't shade well with pyrography equipment given the grain and resin content, so ended up using a single burn temperature for a basic scroll pattern for the sides. The poplar plywood lid is a bit of a better medium for burning and ended up decorating with a monochromatic camp scene. Wanted to emulate the style of wonderful illustrator Les Kouba and the image is a modified scence from Rutstrum's North American Canoe Country
Here is the final result...
A shot of the lid artwork and inner tray
In the end, I decided against adding more artwork on the birch side panels and just varnished the exterior of the whole thing for some basic weather protection. Almost all of my gear is up north with the canoe at the moment, so the wanigan is empty for now. But it is strapped up and ready to go...
Hoping to get some fun usage out of this wanigan along with the homemade camp stool made the previous winter.
Langgan:
Catatan (Atom)