Isnin, 19 April 2010
Soft Maple Northwoods with Rippled Grip - Part 3
Finally got the chance to complete the Maple Northwoods paddle I had been working on since last fall (see Part 1 & Part 2). It's been a while since I've been able to post a new paddle pic in the slideshow gallery.
Over the last few months, I kept it in my den and worked on the decorative pyrography whenever the boy gave me a chance. Nearly complete last month, I heard a ruckus as he grabbed the paddle when I wasn't looking and proceeded to drag it by the blade letting the grip scrape across the stone flooring. Then he decided to run it over with with toy truck and walk up and down the shaft as a kind of trapeze act.


Goofing around

Caught red handed
Good thing I made this out of maple, it came out of the ordeal unscathed. The chip carving pattern along the edges of the blade was continued up the shaft - the first time I ended up decorating a paddle from grip to tip. Here are some shots of the final work before oiling the paddle. The decoration on the tip was meant to be replica of the antique-style copper tips protectors I had posted on earlier.

Completed Paddle

Blade Closeup with "Copper Tip"


Grip Closeups
Read More..
Over the last few months, I kept it in my den and worked on the decorative pyrography whenever the boy gave me a chance. Nearly complete last month, I heard a ruckus as he grabbed the paddle when I wasn't looking and proceeded to drag it by the blade letting the grip scrape across the stone flooring. Then he decided to run it over with with toy truck and walk up and down the shaft as a kind of trapeze act.


Goofing around

Caught red handed
Good thing I made this out of maple, it came out of the ordeal unscathed. The chip carving pattern along the edges of the blade was continued up the shaft - the first time I ended up decorating a paddle from grip to tip. Here are some shots of the final work before oiling the paddle. The decoration on the tip was meant to be replica of the antique-style copper tips protectors I had posted on earlier.

Completed Paddle

Blade Closeup with "Copper Tip"


Grip Closeups
Sabtu, 17 April 2010
Rich Nash - Woodland Heirlooms
Recently received an email from Doris & Rick Nash of Woodland Heirlooms regarding a new website documenting Rick's fanastic bark canoes and other craftsmanship. I've posted some of Rick's works before documenting his amazing skill as a canoe builder and paddle maker. Feast your eyes on some of Rick's gorgeous work below:


Some of Rick's paddles

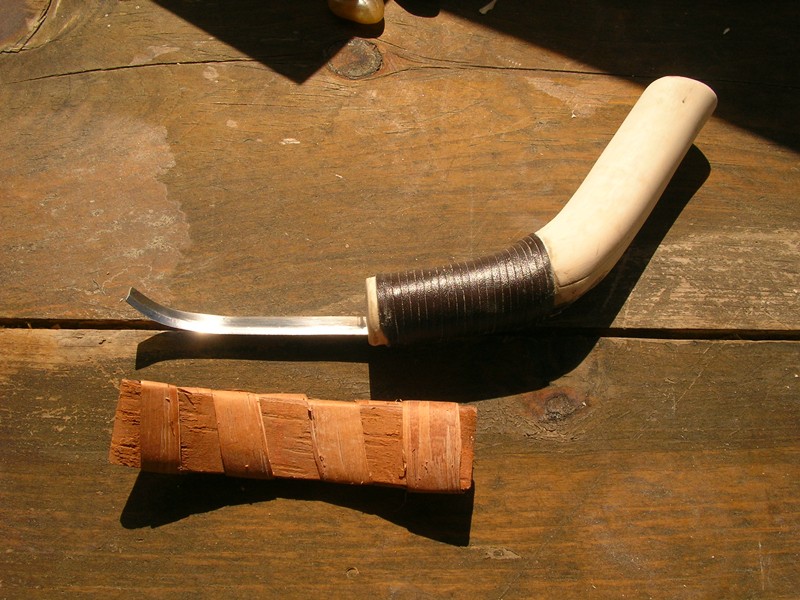
Chip Carved Crooked Knife

Model Bark Canoe
Anyone wanting to contact Rick and inquire about his work can do so by clicking here.
Read More..


Some of Rick's paddles

Chip Carved Crooked Knife

Model Bark Canoe
Anyone wanting to contact Rick and inquire about his work can do so by clicking here.
Rabu, 14 April 2010
Trudeau's Birchbark Canoe
One of the earliest memories I have of seeing a birchbark canoe was a photo of Canada's 15th Prime Minister, Pierre Elliott Trudeau (October 18, 1919 � September 28, 2000) paddling one. Recently I came across the same photo again on the net.

Trudeau in 1974
Trudeau was by no means the only world leader to comprehend the joys of paddling. I've already posted about young Franklin Delano Roosevelt's bark canoe. Intrigued to know more, I started investigating. Trudeau's canoe was apparently built in 1968 by Patrick Maranda of Lac Rapide (Quebec). It was commissioned by the Maniwaki Chamber of Commerce as a wedding gift for the Prime Minister.

Maranda Canoe built circa 1968
Not sure if it is still there, but on my way to the High Arctic in '07, I noticed a beautiful bark canoe on display at the Ottawa Airport Canoe. Turns out it was Trudeau's canoe on loan from the family.

Ottawa International Airport
In 1944, many years before his career in politics, Trudeau wrote an essay entitled, Exhaustion and Fulfillment: The Ascetic in a Canoe. Here's a selected passage
I find the last line particularly poignant as my life lately has been inundated with such "petty preoccupations" as he put it. In my mind I've already started fantasizing about my solo canoe trip planned for this summer.
 To check out Trudeau's 1944 essay in its entirety, click here or for a bit of comic relief, check out this little Parody Skit (RealMedia Format) about the late Prime Minister promoting his memoirs. Loaded with a lot of inside jokes that probably only Canadians would understand, but comical nonetheless even if you are a Trudeau hater/lover.
Read More..

Trudeau in 1974
Trudeau was by no means the only world leader to comprehend the joys of paddling. I've already posted about young Franklin Delano Roosevelt's bark canoe. Intrigued to know more, I started investigating. Trudeau's canoe was apparently built in 1968 by Patrick Maranda of Lac Rapide (Quebec). It was commissioned by the Maniwaki Chamber of Commerce as a wedding gift for the Prime Minister.

Maranda Canoe built circa 1968
Not sure if it is still there, but on my way to the High Arctic in '07, I noticed a beautiful bark canoe on display at the Ottawa Airport Canoe. Turns out it was Trudeau's canoe on loan from the family.

Ottawa International Airport
In 1944, many years before his career in politics, Trudeau wrote an essay entitled, Exhaustion and Fulfillment: The Ascetic in a Canoe. Here's a selected passage
"What sets a canoeing expedition apart is that it purifies you more rapidly and inescapably than any other. Travel a thousand miles by train and you are a brute; pedal five hundred on a bicycle and you remain basically a bourgeois; paddle a hundred in a canoe and you are already a child of nature.
For it is a condition of such a trip that you entrust yourself, stripped of your worldly goods, to nature. Canoe and paddle, blanket and knife, salt pork and flour, fishing rod and rifle; that is about the extent of your wealth. To remove all the useless material baggage from a man's heritage is, at the same time, to free his mind from petty preoccupations, calculations and memories. "
I find the last line particularly poignant as my life lately has been inundated with such "petty preoccupations" as he put it. In my mind I've already started fantasizing about my solo canoe trip planned for this summer.
 To check out Trudeau's 1944 essay in its entirety, click here or for a bit of comic relief, check out this little Parody Skit (RealMedia Format) about the late Prime Minister promoting his memoirs. Loaded with a lot of inside jokes that probably only Canadians would understand, but comical nonetheless even if you are a Trudeau hater/lover.
Ahad, 11 April 2010
Poplar Diamond Passamaquoddy - Part 2
Back during a strange warm spell in January, I enthusiastically rushed out to the balcony to start another padde, a circa 1849 Diamond Bladed Passamaquoddy from Fig. 72 of Adney's book (middle diagram below).

Adney's sketch - Diamond Bladed Passamaquoddy in middle
The blank had been cut from Yellow Poplar (Liriodendron tulipifera), a very easy wood for carving and one of the lightest "hardwoods" out there. While the bulk of the paddle had been shaped using the usual block plane and spokeshave, I wanted to improve on my crooked knife techniques. I found that the kiln-dried yellow poplar was still soft enough to be carved easily with crooked knives, so the grip and shaft were further shaped with these tools.
Adney's plan for the grip is tiny and as a result I had approximated the shape when cutting out the blank and purposely left the grip large and bulky with the idea that it could be customized later. The angled edges of the grip were carved out using my mini-crooked knife while the large-bladed Olivewood handle crooked knife worked well on the long shaft region. After fixing the blade, it has become a fantastic tool. Delicate shavings were twirling off around me.

Carving the grip with the Mini Crooked Knife

Shaft carving with the large bladed knife
Adney's plan shows the grip tapering out at the top until it becomes quite thin...too thin for my liking. I find the palm and forearm muscles get quite tired if you have to squeeze too tightly in order to grasp the paddle, so I left this one thicker than the plan suggests. After working on the angular edges, this is what I was left with.

Grip shaped
The whole thing still needs to be sanded, but the grip area has come along nicely. It is very reminiscient of the flattened grips featured on the Iroquois paddles at the Royal Ontario Museum.
May 30/10 Update: Part 3 has been posted
Read More..

Adney's sketch - Diamond Bladed Passamaquoddy in middle
The blank had been cut from Yellow Poplar (Liriodendron tulipifera), a very easy wood for carving and one of the lightest "hardwoods" out there. While the bulk of the paddle had been shaped using the usual block plane and spokeshave, I wanted to improve on my crooked knife techniques. I found that the kiln-dried yellow poplar was still soft enough to be carved easily with crooked knives, so the grip and shaft were further shaped with these tools.
Adney's plan for the grip is tiny and as a result I had approximated the shape when cutting out the blank and purposely left the grip large and bulky with the idea that it could be customized later. The angled edges of the grip were carved out using my mini-crooked knife while the large-bladed Olivewood handle crooked knife worked well on the long shaft region. After fixing the blade, it has become a fantastic tool. Delicate shavings were twirling off around me.

Carving the grip with the Mini Crooked Knife

Shaft carving with the large bladed knife
Adney's plan shows the grip tapering out at the top until it becomes quite thin...too thin for my liking. I find the palm and forearm muscles get quite tired if you have to squeeze too tightly in order to grasp the paddle, so I left this one thicker than the plan suggests. After working on the angular edges, this is what I was left with.

Grip shaped
The whole thing still needs to be sanded, but the grip area has come along nicely. It is very reminiscient of the flattened grips featured on the Iroquois paddles at the Royal Ontario Museum.
May 30/10 Update: Part 3 has been posted
Khamis, 8 April 2010
Blog Inspired Paddles
Kent Lund sent me a kind email mentioning how a few of the various paddle types featured on the site got him inspired to get back into the paddle making hobby. Check out his fantastic growing collection below which features a nice mix of decorated blades and interesting grip designs:

Kent's growing paddle collection
Many readers of the blog might recognize the 2nd paddle from the right. Kent's version of the Snake Paddle featured back in December of '09. With some extra techniques on the paint job, Kent was able to give the paddle an antique look. Great stuff!
To further personalize some of the paddles, a striped banding around the shafts was added - a customized idea based on a pattern on his daughter's favorite jacket. A unique way to add even more meaning to a family paddle.
As an extra aside, Kent asked me about techniques for giving varnish an aged look. But I not really familiar with any methods that give an authentic, antique appearance. If anyone has suggestions, please comment so we can all learn more. Click the Leave a comment link below the post.
Read More..

Kent's growing paddle collection
Many readers of the blog might recognize the 2nd paddle from the right. Kent's version of the Snake Paddle featured back in December of '09. With some extra techniques on the paint job, Kent was able to give the paddle an antique look. Great stuff!
To further personalize some of the paddles, a striped banding around the shafts was added - a customized idea based on a pattern on his daughter's favorite jacket. A unique way to add even more meaning to a family paddle.
As an extra aside, Kent asked me about techniques for giving varnish an aged look. But I not really familiar with any methods that give an authentic, antique appearance. If anyone has suggestions, please comment so we can all learn more. Click the Leave a comment link below the post.
Selasa, 6 April 2010
Crooked Knife Refurb
While sharpening the homemade crooked knife and practicing on some scrap cedar a while back, the lashed blade began to jiggle and loosen. I quickly realized that the knife needed to be more secure if I was going to use it as a serious carving tool.
One thing I had forgotten to do when originally assembling the knife was bend the tang of the blade at a sharp angle to hook onto the handle wood and prevent movement. After quickly heating up the tang in the cottage fireplace, I bent it up slightly to conform to the angular shape of the handle then bent a sharp hook at the end. The piece of wood selected for the knife had a knot right at the bottom and by sculpting out a hole (with an awl), the hook fit securely into place. The original waxed thread whipping was replaced with flat leather lace I had on hand...much more comfortable. Even though the bottom of the knife looks ugly, the whole thing is amazingly secure with this change.

Bent tang in place

Hook end inserted into carved hole
I had also decided to decorate the handle by burning on a sort of chip-carving motif. The whole decoration was first sketched using pencil and that's what you see in the pics.

Chip-carved motif on handle
This was my first time burning on olive wood and sure enough, the naturally oily material gave off a slightly sizzling aroma. Unfortunately, it also burned unevenly and required constant cleaning of the metal nibs. In the end the pattern turned out too blotchy and I ended up sanding the whole thing off in frustration at the poor quality of the image. Here's the plain, refurbish version ready for some carving...

Resanded to remove the intended pyrographic decoration

Perfect fit for the one-and-only user
Read More..
One thing I had forgotten to do when originally assembling the knife was bend the tang of the blade at a sharp angle to hook onto the handle wood and prevent movement. After quickly heating up the tang in the cottage fireplace, I bent it up slightly to conform to the angular shape of the handle then bent a sharp hook at the end. The piece of wood selected for the knife had a knot right at the bottom and by sculpting out a hole (with an awl), the hook fit securely into place. The original waxed thread whipping was replaced with flat leather lace I had on hand...much more comfortable. Even though the bottom of the knife looks ugly, the whole thing is amazingly secure with this change.

Bent tang in place

Hook end inserted into carved hole
I had also decided to decorate the handle by burning on a sort of chip-carving motif. The whole decoration was first sketched using pencil and that's what you see in the pics.

Chip-carved motif on handle
This was my first time burning on olive wood and sure enough, the naturally oily material gave off a slightly sizzling aroma. Unfortunately, it also burned unevenly and required constant cleaning of the metal nibs. In the end the pattern turned out too blotchy and I ended up sanding the whole thing off in frustration at the poor quality of the image. Here's the plain, refurbish version ready for some carving...
Resanded to remove the intended pyrographic decoration

Perfect fit for the one-and-only user
Jumaat, 2 April 2010
Paddle Blade Warping Problem
Michael Weiser, a reader of the blog, sent me some pics and details of a few paddles he has made. They include 2 laminated versions patterned after Adney's Attikamekw paddle plan and two Northwoods paddles (Stern and Bow). Great looking stuff.

Michael's paddle collection
A problem emerged with his Northwoods bow paddle however. Since these were carved from maple, they were significantly thinned to reduce weight. When dry, the paddle is a "picture of straightness" according to Michael, but upon contact with moisture, the blade severely warps. The paddle was made from flat sawn wood stock with a grain pattern that one would assume, would be pretty ideal for strength and flex. A closeup of the tip reveals the distinct growth rings curving upwards and contributing to the cupping at the tip however.

Grain Pattern on tip

The resultant warping when wet
In addition to discussing issues with low moisture content of the wood stock, Michael also had some other points which add to the mystery. Generally, a dense pattern of annual rings make a wood less prone to warping, but other paddles with even wider spaced annual rings don't warp as much as his paddle. In addition, the larger to radius of the growth rings (a function of the girth of the tree), the flatter the rings appear and the less warping. But Michael's impression is that others have made paddles from similar stock without warping problems.
We've been discussing the options to deal with the absorption through the end grain at the tip, including using varnish (the paddles were originally oiled), sealing with epoxy, etc. But if any other any readers have other suggestions or explanations to this mystery, please feel free to post a comment.
Michael also took the liberty of preparing some basic stats on paddle surface area to illustrate the huge size of the Stern Northwoods. See the info below:
Certainly not a paddle ideal for solo paddling, but advantageous for steering and controlling a heavily loaded tripping canoe down some deep moving water.
Read More..

Michael's paddle collection
A problem emerged with his Northwoods bow paddle however. Since these were carved from maple, they were significantly thinned to reduce weight. When dry, the paddle is a "picture of straightness" according to Michael, but upon contact with moisture, the blade severely warps. The paddle was made from flat sawn wood stock with a grain pattern that one would assume, would be pretty ideal for strength and flex. A closeup of the tip reveals the distinct growth rings curving upwards and contributing to the cupping at the tip however.

Grain Pattern on tip

The resultant warping when wet
In addition to discussing issues with low moisture content of the wood stock, Michael also had some other points which add to the mystery. Generally, a dense pattern of annual rings make a wood less prone to warping, but other paddles with even wider spaced annual rings don't warp as much as his paddle. In addition, the larger to radius of the growth rings (a function of the girth of the tree), the flatter the rings appear and the less warping. But Michael's impression is that others have made paddles from similar stock without warping problems.
We've been discussing the options to deal with the absorption through the end grain at the tip, including using varnish (the paddles were originally oiled), sealing with epoxy, etc. But if any other any readers have other suggestions or explanations to this mystery, please feel free to post a comment.
Michael also took the liberty of preparing some basic stats on paddle surface area to illustrate the huge size of the Stern Northwoods. See the info below:
| Attikamekw 11cm wide/64cm long Attikamekw 12cm wide/70cm long Northwoods Bow Grey Owl Chieftain Grey Owl Tripper Graham Warren's Ottertail Graham Warren's Voyageur Graham Warren's Traditional Beavertail Northwoods Stern | 569 cm / 88 sq in 683 cm2 / 105 sq in 798 cm2 / 123 sq in 800 cm2 / 124 sq in 820 cm2 / 127 sq in 829 cm2 / 128 sq in 895 cm2 / 138 sq in 938 cm2 / 145 sq in 966 cm2 / 149 sq in |
Certainly not a paddle ideal for solo paddling, but advantageous for steering and controlling a heavily loaded tripping canoe down some deep moving water.
Langgan:
Catatan (Atom)