Khamis, 17 Disember 2009
Snake Eyes Folk Art Paddle
Many thanks to Ferdy Goode for sending me a link to an interesting paddle posted at Gould Auctions. Might try making one of these (yet another project!) although with the Mrs. afraid of snakes, I'm not sure if she'd appreciate this one hanging on the wall.
.jpg)


Read More..
.jpg)


A STUNNING 19th century Folk Art carved and painted, full sized CANOE PADDLE in a SUPERIOR original surface. Its shaft is formed by a full relief carved red snake which has yellow glass eyes and a green belly! The paddle measures 67� in length. Found in a Greenville, Maine home. SUPERB original condition.
Ahad, 13 Disember 2009
Refurbished Woods No. 200 Pack: Finished
Finally got around to organizing the photos of my completed refurbished canvas pack project. All that was left was the making of the tumpline. This was quite straightforward and is nearly identical to the Canoe Tump made earlier. This pack tump however, has 1" wide tails that are only 10" long to fit the pack's buckles and is also riveted rather than assembled with brass Chicago screws.


Copper rivetted pack tump; Buckled into place
When taking the pack out for a test run, it was loaded up with plenty of stuff, including some heavy junk (a few 5 pound splitting wedges, hammers, etc.). Sure enough, the frameless pack is a awkward with the shoulder straps alone. But with the tump in place, the weight is held closer to the spine and placed more strategically between the shoulders. Just like the tump carry with the canoe, you need to lean forward a bit, but at the right balancing point, even the hands can be released as you feel the weight transfered to the spine. At full capacity however, I'll likely be gripping the tump strap with both hands for a more balanced carry. Here are some lateral shots taken a while back. This past weekend, the area was hit with 110cm of snow in 48hrs and is now transformed into a winter wonderland.


Shoulder straps alone; Balanced with the tumpline
After taking these shots, I realized I forgot to give the axe holder a test run. With the axehead strapped into the holder and the handle secured with leather lace through the packs eyelet rings, the axe is quite secure in position.

Axe holder of the No.200 Pack
Overall the whole pack has now been transformed and has many more years of use left in it.


Before and...


...After
Out of curiosity, I visited a local outfitter that had a Woods No.1 Special pack for sale ($115 CND + tax). After spending all this time working with my own version, the new models seem to be made with thinner canvas and the leather components made from cheap veg-tanned leather that had not been treated for outdoor use. I imagine that after exposing the pack to the elements of a canoe trip the leather would quickly harden and crack. The cheap splash rivets were attached with minimal support, just leather "washers" on the inside which were weren't even stitched into place. The splayed edges of the rivets were sharp and could easily tear any waterproof drybag inside the pack. Even the tumpline had sharp edged rivets protruding which I pictured cutting into the fingers of the poor soul who tried to hold onto the strap. All in all, a sad testament to the so-called "quality" of today's workmanship compared to years gone by.


New No.1 Special Pack; Tumpline with sharp rivet edges - very shoddy
Read More..


Copper rivetted pack tump; Buckled into place
When taking the pack out for a test run, it was loaded up with plenty of stuff, including some heavy junk (a few 5 pound splitting wedges, hammers, etc.). Sure enough, the frameless pack is a awkward with the shoulder straps alone. But with the tump in place, the weight is held closer to the spine and placed more strategically between the shoulders. Just like the tump carry with the canoe, you need to lean forward a bit, but at the right balancing point, even the hands can be released as you feel the weight transfered to the spine. At full capacity however, I'll likely be gripping the tump strap with both hands for a more balanced carry. Here are some lateral shots taken a while back. This past weekend, the area was hit with 110cm of snow in 48hrs and is now transformed into a winter wonderland.


Shoulder straps alone; Balanced with the tumpline
After taking these shots, I realized I forgot to give the axe holder a test run. With the axehead strapped into the holder and the handle secured with leather lace through the packs eyelet rings, the axe is quite secure in position.

Axe holder of the No.200 Pack
Overall the whole pack has now been transformed and has many more years of use left in it.


Before and...


...After
Out of curiosity, I visited a local outfitter that had a Woods No.1 Special pack for sale ($115 CND + tax). After spending all this time working with my own version, the new models seem to be made with thinner canvas and the leather components made from cheap veg-tanned leather that had not been treated for outdoor use. I imagine that after exposing the pack to the elements of a canoe trip the leather would quickly harden and crack. The cheap splash rivets were attached with minimal support, just leather "washers" on the inside which were weren't even stitched into place. The splayed edges of the rivets were sharp and could easily tear any waterproof drybag inside the pack. Even the tumpline had sharp edged rivets protruding which I pictured cutting into the fingers of the poor soul who tried to hold onto the strap. All in all, a sad testament to the so-called "quality" of today's workmanship compared to years gone by.


New No.1 Special Pack; Tumpline with sharp rivet edges - very shoddy
Jumaat, 11 Disember 2009
Graham Warren Paddlemaking DVD
 Just found out about a new Paddlemaking DVD (scroll down) from Graham Warren of Moosehead Canoes. I've already got both of Graham's paddlemaking books and this DVD looks like it would make a nice visual addition to the library.
His site has some beautiful looking screen shots as well as details of the content. The 90 minute DVD is currently only available in PAL region 2 (UK & Europe) format but a NTSC (North American) format is apparently coming soon. The disc also contains 10 full sized paddle plans in electronic PDF format to print out - very handy.
Khamis, 10 Disember 2009
Refurbished Woods No. 200 Pack: Flap & Tump Straps
A different feature of the Woods Pack compared to the Duluth style is the use of a single leather anchor for both the top flap straps as well as the tump strap buckles. Less stitching and more simple design. On this pack the leather anchors were still quite sound (top rivet hole compromised), but I thought it was still salvageable if a new rivet was simply inserted a little lower. The worn original straps were replaced with 36" long x 1" wide latigo.


Original leather anchor; New flap strap inserted
In front of this strap would be the tumpline buckle. With a folded strip of thin leather (slightly different colour) and a brass buckles (doesn't match the faded steel of the original), the tump buckle was created. A bit tricky to get all the holes lined up for the rivet. After pounding and setting the rivets in with an additional piece of backing leather on the inside (not shown), I realized I made the strap a bit too long and the buckle kept slipping down too much. Another hole was punched and a brass Chicago screw was mounted to secure the buckle into place. Bit of a mistake, but at least the screw matches the brass buckle so the whole thing doesn't clash too much. For symmetry, I ended up doing the same thing for the other buckle strap.


Tump buckle material; Rivetted into place
Buckle holes were punched in the flap strap at 1" intervals and a test run was done by stuffing the pack up with mounds of dirty laundry. The beauty about this design is that the straps can be placed over the topflap parallel (useful to secure a sleeping pad or other gear to the top of the pack) or cross ways to pack akward shaped items. Here are the two configurations below.

 >
>
Parallel straps; Cross over closure
The project is nearly done. All that is needed is the making of a tump for the pack, which should be easy given that I made one already for the canoe. This one will be rivetted however.
Dec 13/09 Update - Pack is now complete. See last stage pics here
Read More..


Original leather anchor; New flap strap inserted
In front of this strap would be the tumpline buckle. With a folded strip of thin leather (slightly different colour) and a brass buckles (doesn't match the faded steel of the original), the tump buckle was created. A bit tricky to get all the holes lined up for the rivet. After pounding and setting the rivets in with an additional piece of backing leather on the inside (not shown), I realized I made the strap a bit too long and the buckle kept slipping down too much. Another hole was punched and a brass Chicago screw was mounted to secure the buckle into place. Bit of a mistake, but at least the screw matches the brass buckle so the whole thing doesn't clash too much. For symmetry, I ended up doing the same thing for the other buckle strap.


Tump buckle material; Rivetted into place
Buckle holes were punched in the flap strap at 1" intervals and a test run was done by stuffing the pack up with mounds of dirty laundry. The beauty about this design is that the straps can be placed over the topflap parallel (useful to secure a sleeping pad or other gear to the top of the pack) or cross ways to pack akward shaped items. Here are the two configurations below.

 >
>Parallel straps; Cross over closure
The project is nearly done. All that is needed is the making of a tump for the pack, which should be easy given that I made one already for the canoe. This one will be rivetted however.
Dec 13/09 Update - Pack is now complete. See last stage pics here
Selasa, 8 Disember 2009
Copper Tipped Antique Paddles
Another post from the Cherry Gallery's current selection...


There was a recent thread on the Wooden Canoe Heritage Association Forums about replicating these copper tip protectors. The general consensus was that the drilling of holes for tacking on the metal protectors was quite damaging to the paddle. But for the history buff that may want to replicate this feature, I suppose it would add a bit of a traditional turn-of-the century feel.
Read More..

Great Pair of Blue Canoe Paddles
This is a pair of beaver-tail paddles in a very appealing shade of original blue paint. The handle and lower shaft were left unpainted for comfort of use, and the blades have protective copper bands around the tips.
Circa 1920
7.5" w, 60" h


There was a recent thread on the Wooden Canoe Heritage Association Forums about replicating these copper tip protectors. The general consensus was that the drilling of holes for tacking on the metal protectors was quite damaging to the paddle. But for the history buff that may want to replicate this feature, I suppose it would add a bit of a traditional turn-of-the century feel.
Sabtu, 5 Disember 2009
Refurbished Woods No.200 Pack: New Shoulder Straps
Continuing with the Recycled Woods Pack project, I had removed all the compromised leather components from the sturdy pack and now needed to clean up the canvas. I ended up using a pretty heavy duty cleanser, TSP and it was very effective in removing most of the embedded dirt and grease, including the huge oil blot on the front. I'm not kidding when I say the wash water looked like black coffee after I was done. The great thing about canvas packs is the breathability of the material. Within a few hours of exposure to sunlight and the windy conditions on the balcony, the bulk of the pack (inside and out) was nearly dry. Below are the photos of the original condition and after washing.


Before and After shots
The TSP also got rid of the left over gunk from the duct tape someone applied to the front (probably a temporary name tag from summer camp). Although the canvas is quite faded from years of exposure to UV, I don't mind the "aged look" and am not planing on redying the canvas.
Now for the leather parts. My intention is to restore this pack to usable function while not obviously spending a fortune. So the replacement leather I have on hand will not perfectly match the dark tone of the original leather, but will do the job. Below is a shot of the leather components that would make up the new shoulder strap rig.

New shoulder strap components
The original leather anchor where the shoulder straps were attached was small and degraded. Instead a larger patch of leather was cut out and would need to be hand stitched to the canvas, along with an identical piece on the inside of the bag. The outer piece is latigo leather and the inner piece a damaged piece of veg-tanned tooling leather that wouldn't really have much other use due to its cosmetic flaws. The stitching was tedious but made easier with a specialty stitching awl - a great investment for future leatherwork, as well as pre-punching the stitching holes. My stitching job isn't machine perfect but the leather anchors are quite secure.


Handstitching the leather anchors - exterior & inside the pack
While progressing with the stitching, the holes where the copper rivets would be inserted were marked and punched out. Once the anchors were in place, 3/4" number 9 copper rivets were pounded into place. The burrs were set with with a rivetting tool, the rivets snipped and the whole thing secured into place to form a very sturdy setup.


Copper Rivets outside; Burrs on the inside (before snipping)
To finish off the straps, thinner 1" strips were rivetted to the main 2" wide shoulder straps. Didn't know which way the rivets should point, either with the burr facing out or facing in. In the end I opted on reversing the post so that the flat side would be on the inside of the straps and the preened rivet would slightly project on the outside. Duluth seems to do this with their packs and it makes sense from a comfort point of view to prevent the rivet from snagging on clothing when wearing the pack. Buckle holes punched every inch and this part of the repair all done.


Prepping the buckle straps; Rivetted and punched
Next up - repair to the top flap straps and the tumpline buckles. Next post posted here.
Read More..


Before and After shots
The TSP also got rid of the left over gunk from the duct tape someone applied to the front (probably a temporary name tag from summer camp). Although the canvas is quite faded from years of exposure to UV, I don't mind the "aged look" and am not planing on redying the canvas.
Now for the leather parts. My intention is to restore this pack to usable function while not obviously spending a fortune. So the replacement leather I have on hand will not perfectly match the dark tone of the original leather, but will do the job. Below is a shot of the leather components that would make up the new shoulder strap rig.

New shoulder strap components
The original leather anchor where the shoulder straps were attached was small and degraded. Instead a larger patch of leather was cut out and would need to be hand stitched to the canvas, along with an identical piece on the inside of the bag. The outer piece is latigo leather and the inner piece a damaged piece of veg-tanned tooling leather that wouldn't really have much other use due to its cosmetic flaws. The stitching was tedious but made easier with a specialty stitching awl - a great investment for future leatherwork, as well as pre-punching the stitching holes. My stitching job isn't machine perfect but the leather anchors are quite secure.


Handstitching the leather anchors - exterior & inside the pack
While progressing with the stitching, the holes where the copper rivets would be inserted were marked and punched out. Once the anchors were in place, 3/4" number 9 copper rivets were pounded into place. The burrs were set with with a rivetting tool, the rivets snipped and the whole thing secured into place to form a very sturdy setup.


Copper Rivets outside; Burrs on the inside (before snipping)
To finish off the straps, thinner 1" strips were rivetted to the main 2" wide shoulder straps. Didn't know which way the rivets should point, either with the burr facing out or facing in. In the end I opted on reversing the post so that the flat side would be on the inside of the straps and the preened rivet would slightly project on the outside. Duluth seems to do this with their packs and it makes sense from a comfort point of view to prevent the rivet from snagging on clothing when wearing the pack. Buckle holes punched every inch and this part of the repair all done.


Prepping the buckle straps; Rivetted and punched
Next up - repair to the top flap straps and the tumpline buckles. Next post posted here.
Khamis, 3 Disember 2009
Canoe Paddle Plans
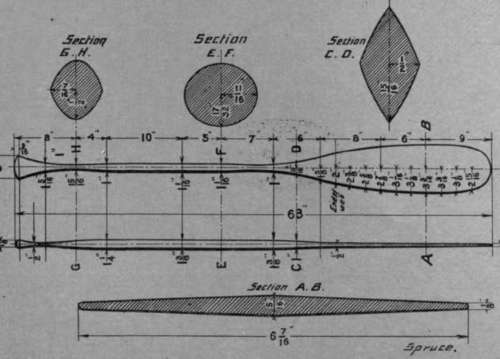
From the 1905 online book, Problems in Woodworking, is a chapter about canoe paddles. Included is a diagram of a standard beavertail paddle with pear grip showing all the relevant specs for width, length, and thickness. Interesting to note the thinning of the circular shaft (1-1/8th inch) down to 1 inch at the throat of the blade. I generally make the shafts on my paddles 1-1/8th inch thick as well but never really thinned the throat like this plan shows. Logically I wonder if it would weaken the paddle right at this location where the large blade area of this design would presumably concentrate the most force.

Paddle Plans
Read More..
Paddle Plans
Langgan:
Catatan (Atom)